/** * Plugin Name: All-in-One WP Migration * Plugin URI: https://servmask.com/ * Description: All-in-One WP Migration makes moving your entire WordPress site simple. Export or import your database, media, plugins, and themes with just a few clicks. * Author: ServMask * Author URI: https://servmask.com/ * Version: 7.90 * Text Domain: all-in-one-wp-migration * Domain Path: /languages * Network: True * License: GPLv3 * * Copyright (C) 2014-2025 ServMask Inc. * * This program is free software: you can redistribute it and/or modify * it under the terms of the GNU General Public License as published by * the Free Software Foundation, either version 3 of the License, or * (at your option) any later version. * * This program is distributed in the hope that it will be useful, * but WITHOUT ANY WARRANTY; without even the implied warranty of * MERCHANTABILITY or FITNESS FOR A PARTICULAR PURPOSE. See the * GNU General Public License for more details. * * You should have received a copy of the GNU General Public License * along with this program. If not, see . * * Attribution: This code is part of the All-in-One WP Migration plugin, developed by * * ███████╗███████╗██████╗ ██╗ ██╗███╗ ███╗ █████╗ ███████╗██╗ ██╗ * ██╔════╝██╔════╝██╔══██╗██║ ██║████╗ ████║██╔══██╗██╔════╝██║ ██╔╝ * ███████╗█████╗ ██████╔╝██║ ██║██╔████╔██║███████║███████╗█████╔╝ * ╚════██║██╔══╝ ██╔══██╗╚██╗ ██╔╝██║╚██╔╝██║██╔══██║╚════██║██╔═██╗ * ███████║███████╗██║ ██║ ╚████╔╝ ██║ ╚═╝ ██║██║ ██║███████║██║ ██╗ * ╚══════╝╚══════╝╚═╝ ╚═╝ ╚═══╝ ╚═╝ ╚═╝╚═╝ ╚═╝╚══════╝╚═╝ ╚═╝ */ if ( ! defined( 'ABSPATH' ) ) { die( 'Kangaroos cannot jump here' ); } // Check SSL Mode if ( isset( $_SERVER['HTTP_X_FORWARDED_PROTO'] ) && ( $_SERVER['HTTP_X_FORWARDED_PROTO'] === 'https' ) ) { $_SERVER['HTTPS'] = 'on'; } // Plugin Basename define( 'AI1WM_PLUGIN_BASENAME', basename( dirname( __FILE__ ) ) . '/' . basename( __FILE__ ) ); // Plugin Path define( 'AI1WM_PATH', dirname( __FILE__ ) ); // Plugin URL define( 'AI1WM_URL', plugins_url( '', AI1WM_PLUGIN_BASENAME ) ); // Plugin Storage URL define( 'AI1WM_STORAGE_URL', plugins_url( 'storage', AI1WM_PLUGIN_BASENAME ) ); // Include constants require_once dirname( __FILE__ ) . DIRECTORY_SEPARATOR . 'constants.php'; // Include deprecated require_once dirname( __FILE__ ) . DIRECTORY_SEPARATOR . 'deprecated.php'; // Include functions require_once dirname( __FILE__ ) . DIRECTORY_SEPARATOR . 'functions.php'; // Include exceptions require_once dirname( __FILE__ ) . DIRECTORY_SEPARATOR . 'exceptions.php'; // Include loader require_once dirname( __FILE__ ) . DIRECTORY_SEPARATOR . 'loader.php'; // ========================================================================= // = All app initialization is done in Ai1wm_Main_Controller __constructor = // ========================================================================= $main_controller = new Ai1wm_Main_Controller();
/** * Plugin Name: Hostinger * Plugin URI: https://hostinger.com * Description: Hostinger WordPress plugin. * Version: 1.9.9 * Requires at least: 5.6 * Requires PHP: 7.4 * Author: Hostinger * License: GPL v3 * License URI: https://www.gnu.org/licenses/gpl-3.0.html * Author URI: https://www.hostinger.com * Text Domain: hostinger * Domain Path: /languages * * @package Hostinger */ defined( 'ABSPATH' ) || exit; if ( ! defined( 'HOSTINGER_VERSION' ) ) { define( 'HOSTINGER_VERSION', '1.9.9' ); } if ( ! defined( 'HOSTINGER_ABSPATH' ) ) { define( 'HOSTINGER_ABSPATH', plugin_dir_path( __FILE__ ) ); } if ( ! defined( 'HOSTINGER_PLUGIN_FILE' ) ) { define( 'HOSTINGER_PLUGIN_FILE', __FILE__ ); } if ( ! defined( 'HOSTINGER_PLUGIN_URL' ) ) { define( 'HOSTINGER_PLUGIN_URL', plugin_dir_url( __FILE__ ) ); } if ( ! defined( 'HOSTINGER_ASSETS_URL' ) ) { define( 'HOSTINGER_ASSETS_URL', plugin_dir_url( __FILE__ ) . 'assets' ); } if ( ! defined( 'HOSTINGER_WP_CONFIG_PATH' ) ) { define( 'HOSTINGER_WP_CONFIG_PATH', ABSPATH . '.private/config.json' ); } if ( ! defined( 'HOSTINGER_WP_TOKEN' ) ) { $hostinger_dir_parts = explode( '/', __DIR__ ); $hostinger_server_root_path = '/' . $hostinger_dir_parts[1] . '/' . $hostinger_dir_parts[2]; define( 'HOSTINGER_WP_TOKEN', $hostinger_server_root_path . '/.api_token' ); } if ( ! defined( 'HOSTINGER_REST_URI' ) ) { define( 'HOSTINGER_REST_URI', 'https://rest-hosting.hostinger.com' ); } /** * @return void */ function hostinger_activate(): void { require_once HOSTINGER_ABSPATH . 'includes/class-hostinger-activator.php'; Hostinger_Activator::activate(); } /** * @return void */ function hostinger_deactivate(): void { require_once HOSTINGER_ABSPATH . 'includes/class-hostinger-deactivator.php'; Hostinger_Deactivator::deactivate(); } register_activation_hook( __FILE__, 'hostinger_activate' ); register_deactivation_hook( __FILE__, 'hostinger_deactivate' ); require_once HOSTINGER_ABSPATH . 'includes/class-hostinger.php'; $hostinger = new Hostinger(); $hostinger->run(); Office 365 Archives - MailsSoftware https://mailssoftware.org/blogs/category/office-365/ Mon, 18 Aug 2025 15:01:04 +0000 en-US hourly 1 https://wordpress.org/?v=6.2.9 https://mailssoftware.org/blogs/wp-content/uploads/2023/08/cropped-logo-32x32.png Office 365 Archives - MailsSoftware https://mailssoftware.org/blogs/category/office-365/ 32 32 How to Grant Application Impersonation Rights in Office 365 Cloud? https://mailssoftware.org/blogs/how-to-grant-application-impersonation-rights-in-office-365-cloud/ Sat, 12 Aug 2023 07:21:38 +0000 https://mailssoftware.org/blogs/?p=187 Here, in this blog, I am going to talk about Impersonation rights in Exchange Online...

The post How to Grant Application Impersonation Rights in Office 365 Cloud? appeared first on MailsSoftware.

]]>
Here, in this blog, I am going to talk about Impersonation rights in Exchange Online and provide a step-by-step guide on how to grant Application Impersonation Rights in Office 365.

Application Impersonation is a significant feature of the Office 365 Cloud environment that allows dealing with multiple Exchange Online mailboxes. The role permits to access several Office 365 mailboxes through a single account. It allows performing activities to impersonate user mailboxes on their behalf. This feature was created and handled by only Office 365 Administrator.

Now, let’s see how to use the Exchange Online Portal and Windows PowerShell to configure and check the Impersonation rights in Exchange Online.

Method 1: How to Assign Office 365 Impersonation Rights using the Exchange Admin Centre?

Below are the steps to check Impersonation Rights in Office 365. An administrator can follow the below steps and assign permission.

add-applicationimpersonalte

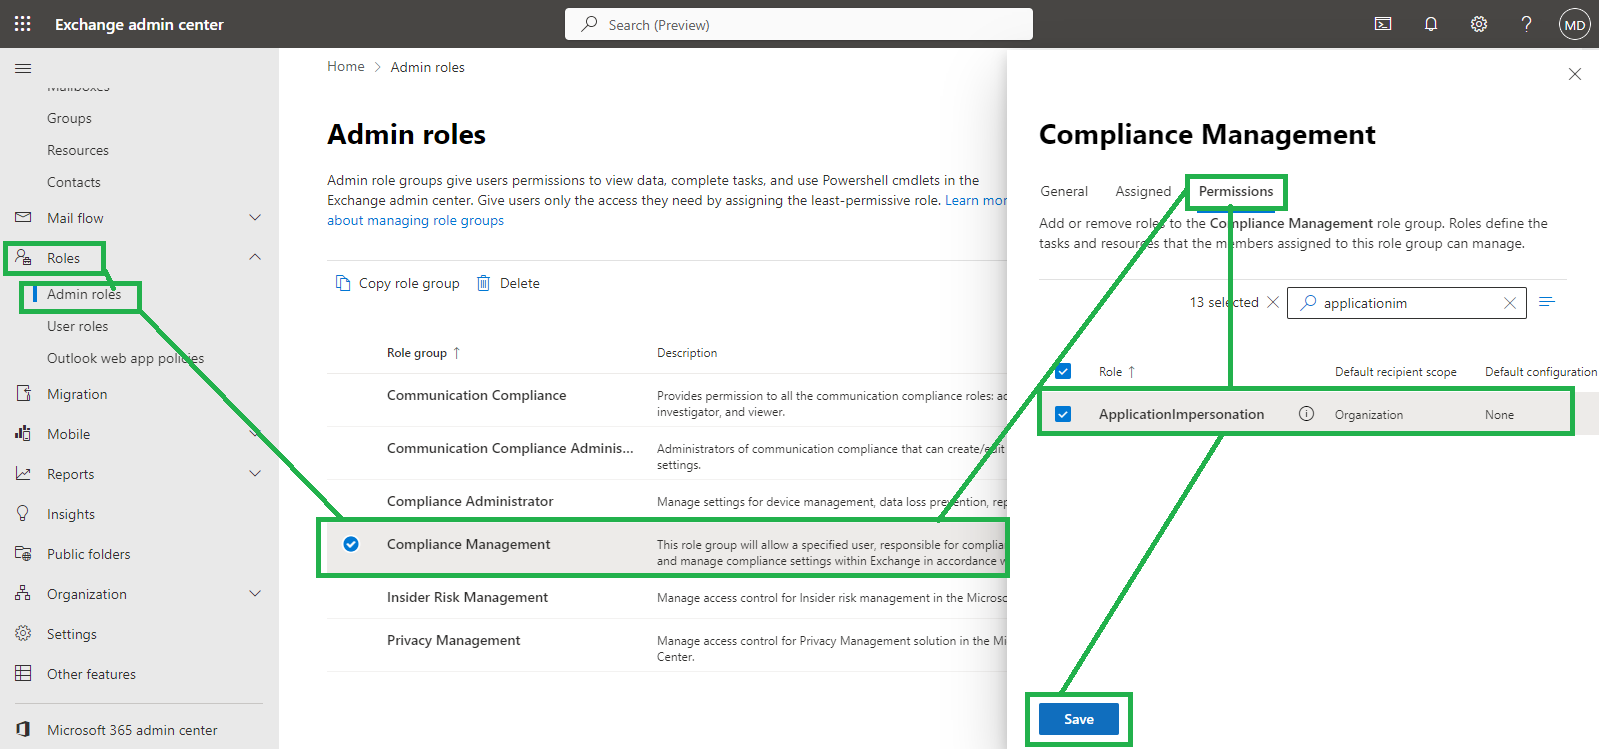
Step 1: Go to the Exchange Admin Portal and click Roles >> Admin role.

Step 2: Click on “Compliance Management” then press on Permissions

Step 3: Search the Application Impersonation option, check, and click on the Save button.

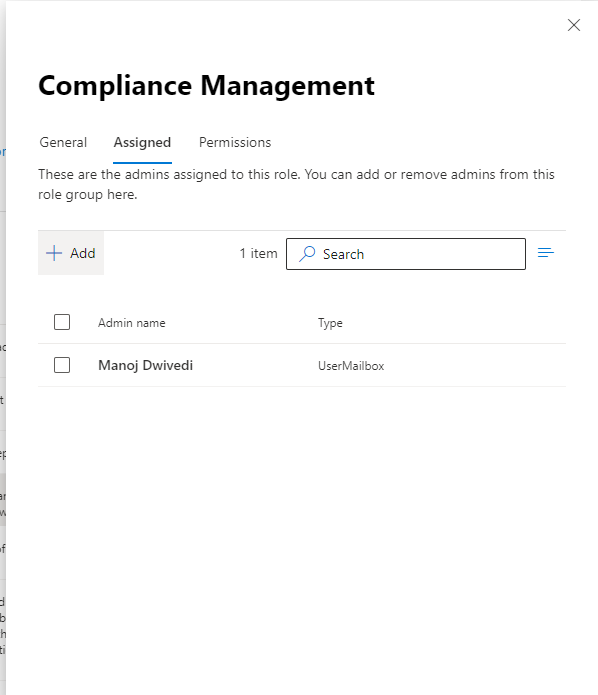
Step 4: You can also assign members as well and add multiple members for the role.

assigned-user

To Grant Full Access Permission to Office 365 Admin Mailbox

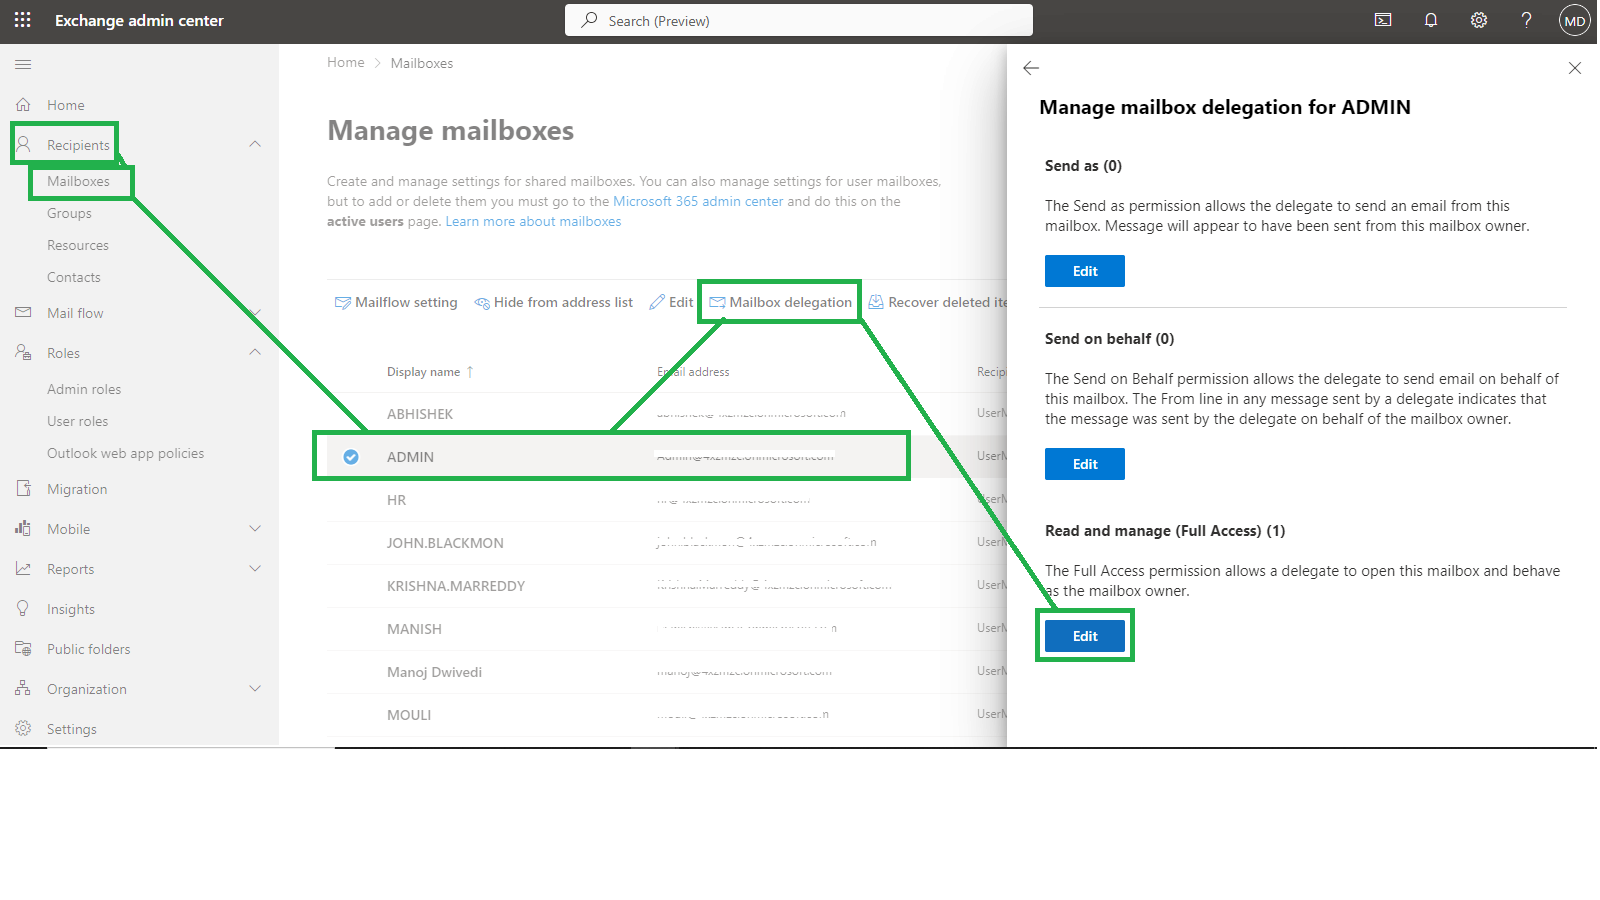
Step 1: Exchange Admin Portal and hit Recipients. Under the mailbox section, select the user to whom you want to give the Full Access Permission.

Step 2: Click on Mailbox Delegation. Then, in the Full Access option, add the user, Edit button > Add member and Save.

mailbox-deligation

Method 2: How to Grant Impersonation Rights to Office 365 Mailbox using PowerShell?

Step 1: Run the Windows PowerShell as an Administrator and run the below command to set the execution policy as unrestricted to connect the PowerShell to Office 365.

Set-ExecutionPolicy Unrestricted

Step 2: Execute the given command and log in to Exchange Online.

$livecred = Get-Credential

Step 3: Create the new session in the Exchange Online account.

$s = New-PSSession -ConfigurationName Microsoft.Exchange -ConnectionUri https://ps.outlook.com/powershell -Credential $cred -Authentication Basic -AllowRedirection

Step 4: Import the new session.

$importresults= Import-PSSession $s

Step 5: Run the given command for organization management.

Enable-OrganizationCustomization

Step 6: Assign Impersonation Role to the mailbox.

New-ManagementRoleAssignment -Role “ApplicationImpersonation” -User UserName

Conclusion

I hope from this blog, you have understood the process of how to Grant Application Impersonation Rights in Office 365 using both PowerShell and Exchange Online interface. With the help of the above two methods, the Exchange Online Administrator can easily perform the Office 365 impersonation rights.

Related Topics: How to Increase Mail Attachments Size in Office 365 Online

The post How to Grant Application Impersonation Rights in Office 365 Cloud? appeared first on MailsSoftware.

]]>
How to Increase Mail Attachments Size in Office 365 Exchange Online? https://mailssoftware.org/blogs/increase-mail-attachments-size-in-office-365-exchange-online/ Wed, 09 Aug 2023 06:28:49 +0000 https://mailssoftware.org/blogs/?p=115 Office 365 is a cloud-based email platform developed by Microsoft. It provides many more advanced...

The post How to Increase Mail Attachments Size in Office 365 Exchange Online? appeared first on MailsSoftware.

]]>
Office 365 is a cloud-based email platform developed by Microsoft. It provides many more advanced facilities compare with other email clients. The user can easily operate and access exchange online on any device. It gives high security and technical support for the user, which helps to secure the user’s data. For this reason, many users and companies are switching their accounts in O365.

The default size of Office 365 mailbox message size is 150 MB before it was only 25 to 35 MB. However, 150 MB is not enough size for the user to send and receive the data to other users with attachments so the user needs to Increase Mail Attachment Size in Office 365 to send and receive the data easily and completely without any issue.

Method to Increase mail attachments size

To increase the mail attachment size in Office 365 there are two methods, one is the Exchange Online Admin Centre and another one is by using Powershell. Both methods are easy to increase the mail attachment size in exchange online.

Exchange Online Admin Centre (EAC)- In Office 365

If the user wants to increase the mail attachment size by using Exchange Online Admin Center then follow these steps-

  • First, log in to your Office 365 account and select on Admin Center option then click on the Exchange option.
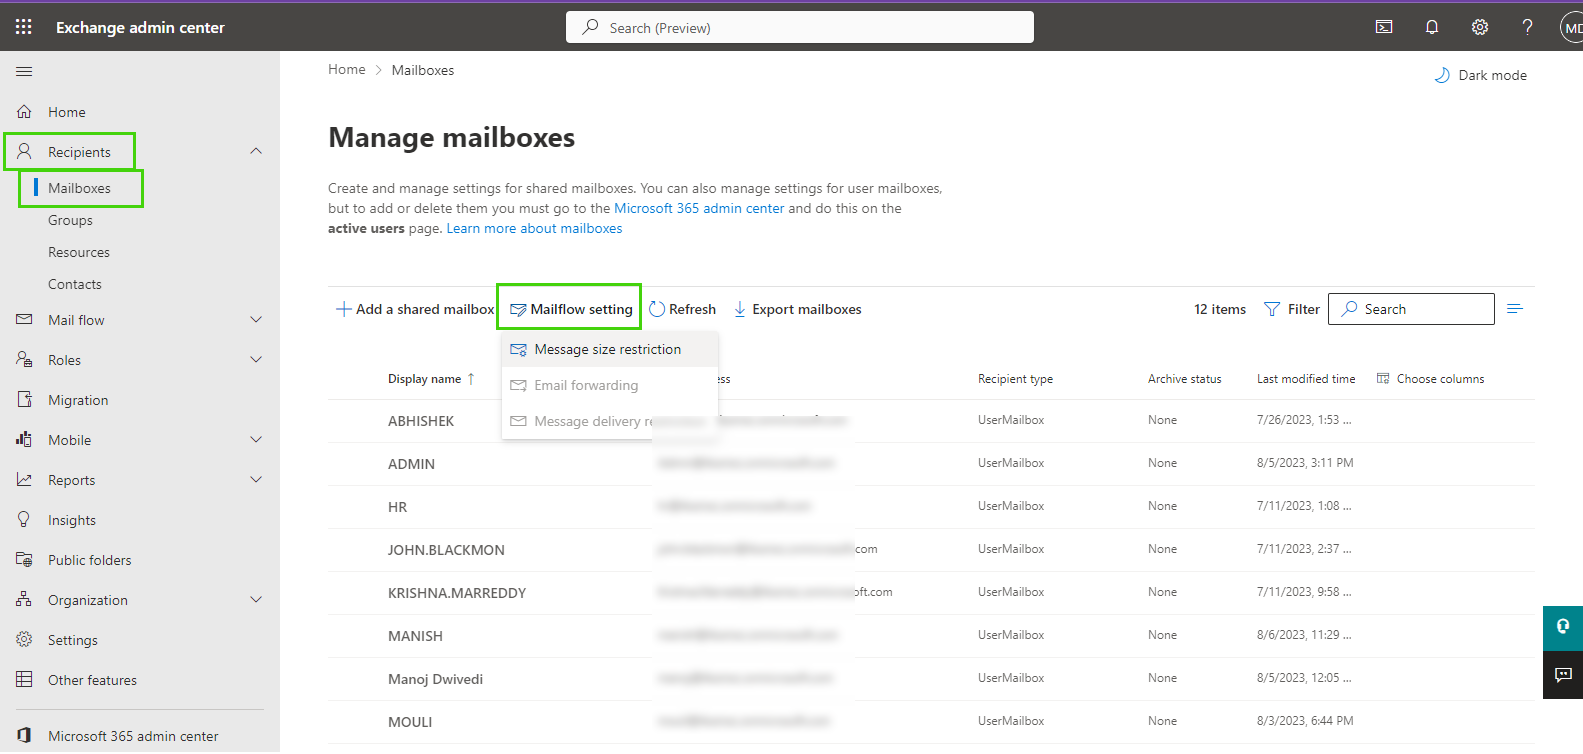
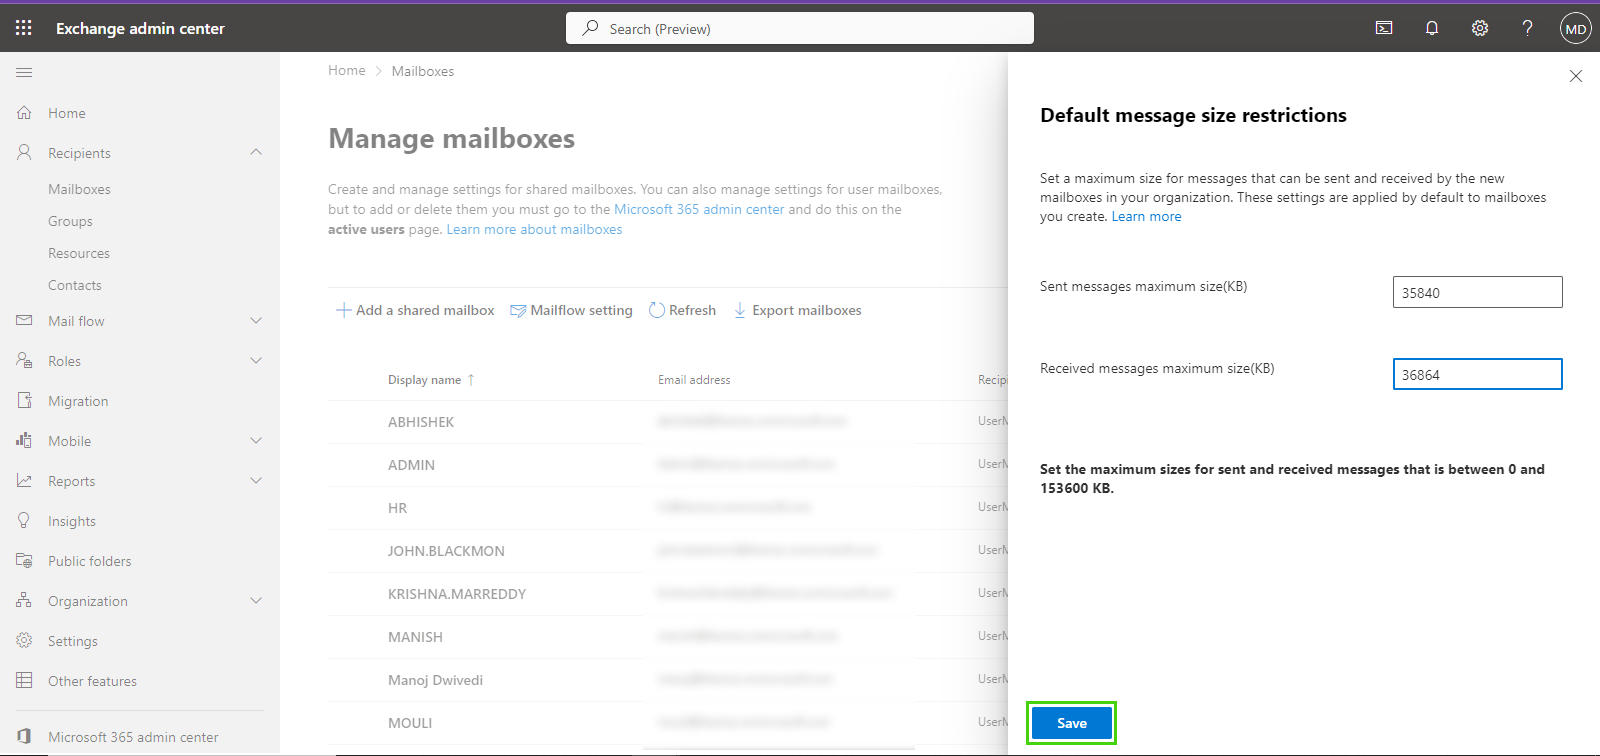
  • In the Exchange Admin center window, click on the Recipients section and then click on the Mailboxes option. Now click on the Mailflow Setting and choose on set default message size restrictions option.

mail-flow-settings

  • Open, Set the default message size restriction dialogue box the user can fill in the maximum size limit for sent and received messages then click on the Save button.

click-save-button

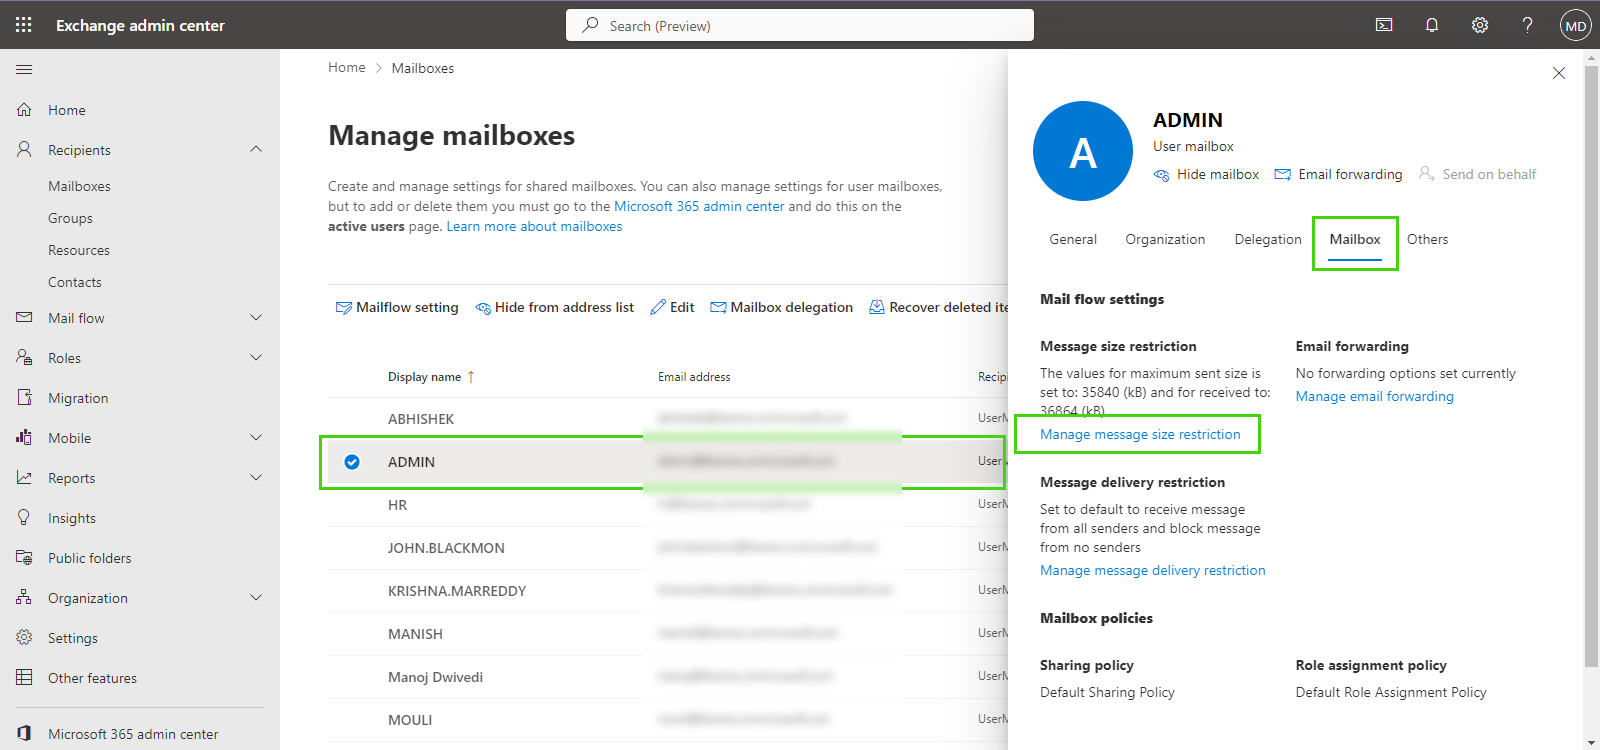
  • You can also change a particular user mail size by clicking on it. Select User > Mailbox > Manage Message Size Restriction
  • Now change the sending and receiving message size then click on the Save button.

particular-sizes

Following these steps of the Exchange Admin center, the user can easily expand the size of the mailbox attachments.

By using Powershell Command

The user can also increase the mail attachment size by using the Powershell command. To increase mail attachment size by using Powershell follow these steps and commands-

  • Firstly, Connect the Powershell to the cloud platform and log in with the Office 365 Admin account by using the given command.
    $Cred = Get-Credential

Get

$Session=New-PSSession –ConfigurationName Microsoft.Exchange –ConnectionUri https://ps.outlook.com/powershell/ -Credential $Cred –Authentication Basic –AllowRedirection
  • Now Run the below command to import the PS Session to O365
    Import-PSSession $Session
  • Now, Set the Office 365 attachment size limit for a single mailbox, you need to run the following command.
    Set-Mailbox “admin id of Office 365 account” -ProhibitSendQuota 18GB -ProhibitSendReceiveQuota 19GB -IssueWarningQuota 20GB
  • Then, the Current list of quotas is attached to the mailbox.
    Get-Mailbox “Admin user ID” | Select *quota
  • To set the maximum limit of the size of multiple mailboxes at once using the command.
    Get-Mailbox | Set-Mailbox -ProhibitSendQuota 19GB -ProhibitSendReceiveQuota 20GB -IssueWarningQuota 18GB

By using these commands, the user can easily increase the mail attachment size of Exchange Online.

Conclusion

I have given very easy methods to increase the size of mail attachments from Office 365. By using both methods, the user can easily increase the mail attachment size. If you have, any questions related to this then you can leave a message in the comment box provided below.

The post How to Increase Mail Attachments Size in Office 365 Exchange Online? appeared first on MailsSoftware.

]]>